FightCombat : Différence entre versions
(voila une première partie. Je continuerais plus tard.) |
|||
| Ligne 9 : | Ligne 9 : | ||
<center> | <center> | ||
| − | <gallery widths="250px" heights=" | + | <gallery widths="250px" heights="350px" perrow="4"> |
Image:CLACV23.jpg|<Center>Banque. | Image:CLACV23.jpg|<Center>Banque. | ||
Image:CLAQRI01.jpg|<Center>Cimetière. | Image:CLAQRI01.jpg|<Center>Cimetière. | ||
Image:CLAQRE15.jpg|<Center>Hopital Sainte-Marie | Image:CLAQRE15.jpg|<Center>Hopital Sainte-Marie | ||
| − | |||
| − | |||
Image:CLAQRI11.jpg|<Center>Cimetière. [[Image:Icone2.jpg|La Malédiction Du Pharaon Noir]] | Image:CLAQRI11.jpg|<Center>Cimetière. [[Image:Icone2.jpg|La Malédiction Du Pharaon Noir]] | ||
Image:CLAQM21.jpg|<Center>Quai. [[Image:Icone2.jpg|La Malédiction Du Pharaon Noir]] | Image:CLAQM21.jpg|<Center>Quai. [[Image:Icone2.jpg|La Malédiction Du Pharaon Noir]] | ||
| − | |||
| − | |||
Image:CLAFH16.jpg|<Center>Maison de la Sorcière. [[Image:Icone1.jpg|L'Horreur De Dunwich]] | Image:CLAFH16.jpg|<Center>Maison de la Sorcière. [[Image:Icone1.jpg|L'Horreur De Dunwich]] | ||
Image:CLDLD12.jpg|<Center>Champs Maléfiques. [[Image:Icone1.jpg|L'Horreur De Dunwich]] | Image:CLDLD12.jpg|<Center>Champs Maléfiques. [[Image:Icone1.jpg|L'Horreur De Dunwich]] | ||
Image:CLDLD10.jpg|<Center>Maison des Gardner. [[Image:Icone1.jpg|L'Horreur De Dunwich]] | Image:CLDLD10.jpg|<Center>Maison des Gardner. [[Image:Icone1.jpg|L'Horreur De Dunwich]] | ||
| − | |||
| − | |||
Image:CLAQM20.jpg|<Center>Ile inexplorée [[Image:Icone3.jpg|Le Roi En Jaune]] | Image:CLAQM20.jpg|<Center>Ile inexplorée [[Image:Icone3.jpg|Le Roi En Jaune]] | ||
Image:CLAQM03.jpg|<Center>Ile inexplorée [[Image:Icone3.jpg|Le Roi En Jaune]] | Image:CLAQM03.jpg|<Center>Ile inexplorée [[Image:Icone3.jpg|Le Roi En Jaune]] | ||
| Ligne 36 : | Ligne 30 : | ||
== [[Compétences]] == | == [[Compétences]] == | ||
| − | <center><gallery widths=" | + | <center><gallery widths="170px" heights="245px" perrow="5"> |
Image:Tireur_D%27Elite.jpg|<Center>[[Tireur d'Elite]] (x2) | Image:Tireur_D%27Elite.jpg|<Center>[[Tireur d'Elite]] (x2) | ||
Image:Agressif.jpg|<Center>[[Agressif]] [[Image:Icone1.jpg|L'Horreur de Dunwich]] | Image:Agressif.jpg|<Center>[[Agressif]] [[Image:Icone1.jpg|L'Horreur de Dunwich]] | ||
| Ligne 46 : | Ligne 40 : | ||
== [[Alliés]] == | == [[Alliés]] == | ||
| − | <center><gallery widths=" | + | <center><gallery widths="170px" heights="245px" perrow="5"> |
Image:Allié David Packard.jpg|<Center>[[David Packard]] [[Image:Icone2.jpg|La Malédiction Du Pharaon Noir]] | Image:Allié David Packard.jpg|<Center>[[David Packard]] [[Image:Icone2.jpg|La Malédiction Du Pharaon Noir]] | ||
Image:Allié Erica Carlyle.jpg|<Center>[[Erica Carlyle]] [[Image:Icone2.jpg|La Malédiction Du Pharaon Noir]] | Image:Allié Erica Carlyle.jpg|<Center>[[Erica Carlyle]] [[Image:Icone2.jpg|La Malédiction Du Pharaon Noir]] | ||
| Ligne 54 : | Ligne 48 : | ||
| − | == [[Objets]] == | + | == [[Objets Communs]] == |
| − | + | <center> | |
| + | <gallery widths="170px" heights="245px" perrow="5"> | ||
| + | Image:Automatique 45.jpg|<Center>[[Automatique 45]] (x2) | ||
| + | Image:Couteau.jpg|<Center>[[Couteau]] (x2) | ||
| + | Image:Croix.jpg|<Center>[[Croix]] (x2) | ||
| + | Image:Derringer.jpg|<Center>[[Derringer]] (x2) | ||
| + | Image:Dynamite.jpg|<Center>[[Dynamite]] (x2) | ||
| + | Image:Fouet.jpg|<Center>[[Fouet]] (x2) | ||
| + | Image:Fusil.jpg|<Center>[[Fusil]] (x2) | ||
| + | Image:Fusil à pompe.jpg|<Center>[[Fusil à Pompe]] (x2) | ||
| + | Image:Hache.jpg|<Center>[[Hache]] (x2) | ||
| + | Image:Mitraillette.jpg|<Center>[[Mitraillette]] (x2) | ||
| + | Image:Révolver 38.jpg|<Center>[[Révolver .38]] (x2) | ||
| + | Image:Sabre.jpg|<Center>[[Sabre de Cavalerie]] (x2) | ||
| + | Image:Carabine.jpg|<Center>[[Carabine]] [[Image:Icone1.jpg|L'Horreur De Dunwich]] (x2) | ||
| + | Image:Cocktail Molotov.jpg|<Center>[[Cocktail Molotov]] [[Image:Icone1.jpg|L'Horreur De Dunwich]] (x2) | ||
| + | Image:Lance-Flammes.jpg|<Center>[[Lance Flammes]] [[Image:Icone1.jpg|L'Horreur De Dunwich]] (x2) | ||
| + | Image:Poing Américain.jpg|<Center>[[Poing Américain]] [[Image:Icone1.jpg|L'Horreur De Dunwich]] | ||
| + | Image:Athame.jpg|<Center>[[Athame]] [[Image:Icone3.jpg|Le Roi En Jaune]] (x2) | ||
| + | Image:Fusil A Eléphant.jpg|<Center>[[Fusil A Eléphant]] [[Image:Icone4.jpg|L'Horreur De Kingsport]] (x2) | ||
| + | Image:Kérosène.jpg|<Center>[[Kérosène]] [[Image:Icone4.jpg|L'Horreur De Kingsport]] (x2) | ||
| + | Image:Menottes.jpg|<Center>[[Menottes]] [[Image:Icone4.jpg|L'Horreur De Kingsport]] (x2) | ||
| + | </gallery> | ||
| + | <br></center> | ||
| − | + | == [[Objets Uniques]]== | |
| + | <center><gallery widths="170px" heights="245px" perrow="5"> | ||
| + | Image:Couteau Enchanté.jpg|<Center>[[Couteau Enchanté]] (x2) | ||
| + | Image:Eau Bénite.jpg|<Center>[[Eau Bénite]] (x4) | ||
| + | Image:Épée de gloire.jpg|<Center>[[Épée de Gloire]] | ||
| + | Image:Flute.jpg|<Center>[[Flûte des Dieux Extérieurs]] | ||
| + | Image:Gardien_bleu.jpg|<Center>[[Gardien Bleu de la Pyramide]]<br>Le premier est COMBAT, le second est FIGHT | ||
| + | Image:Lame enchantée.jpg|<Center>[[Lame Enchantée]] (x2) | ||
| + | Image:Lampe d'alhazred.jpg|<Center>[[Lampe d'Alhazred]] | ||
| + | Image:Poudre d'ibn-ghazi.jpg|<Center>[[Poudre d'Ibn-Ghazi]] (x2) | ||
| + | Image:Statue de garde.jpg|<Center>[[Statue de Garde]] | ||
| + | Image:Bâton De Quête.jpg|<Center>[[Bâton De Quête]] [[Image:Icone1.jpg|L'Horreur De Dunwich]] | ||
| + | Image:Canne Enchantée.jpg|<Center>[[Canne Enchantée]] [[Image:Icone1.jpg|L'Horreur De Dunwich]] | ||
| + | Image:Epée D'Or De Y'ha-Talla.jpg|<Center>[[Epée D'Or De Y'ha Talla]] [[Image:Icone1.jpg|L'Horreur De Dunwich]] (x2) | ||
| + | Image:Outil Extraterrestre.jpg|<Center>[[Outil Extraterrestre]] [[Image:Icone1.jpg|L'Horreur De Dunwich]] | ||
| + | Image:Collection De Cryptozoologie.jpg|<Center>[[Collection De Cryptozoologie]] [[Image:Icone3.jpg|Le Roi En Jaune]] | ||
| + | Image:Glaive De Carcosa.jpg|<Center>[[Glaive De Carcosa]] [[Image:Icone3.jpg|Le Roi En Jaune]] (x3) | ||
| + | Image:Solution Pétrifiante.jpg|<Center>[[Solution Pétrifiante]] [[Image:Icone3.jpg|Le Roi En Jaune]] (x3) | ||
| + | Image:Sphère Maudite.jpg|<Center>[[Sphère Maudite]] [[Image:Icone3.jpg|Le Roi En Jaune]] | ||
| + | Image:Brasier Des Ames.jpg|<Center>[[Brasier Des Ames]] [[Image:Icone4.jpg|L'Horreur De Kingsport]] | ||
| + | Image:Fusil Yithien.jpg|<Center>[[Fusil Yithien]] [[Image:Icone4.jpg|L'Horreur De Kingsport]] (x2) | ||
| + | </gallery> | ||
| + | <br></center> | ||
| + | == [[Objets De L'Exposition]] == | ||
| + | <center><gallery widths="170px" heights="245px" perrow="5"> | ||
| + | Image:Cloche De Ra.jpg|<Center>[[Cloche De Ra]] [[Image:Icone2.jpg|La malédiction Du Pharaon Noir]] (x2) | ||
| + | </gallery> | ||
| + | <br></center> | ||
| + | |||
| + | == [[Sorts]] == | ||
| + | <center><gallery widths="170px" heights="245px" perrow="5"> | ||
| + | Image:Atrophie.jpg|<Center>[[Atrophie]] (x6) | ||
| + | Image:Flétrissement.jpg|<Center>[[Flétrissement]] (x5) | ||
| + | Image:Lier_un_monstre.jpg|<Center>[[Lier un Monstre]] (x2) | ||
| + | Image:Malédiction d'azathoth.jpg|<Center>[[Terrible Malédiction d'Azathoth]] (x4) | ||
| + | Image:Fracassement.jpg|<Center>[[Fracassement]] [[Image:Icone1.jpg|L'Horreur De Dunwich]] (x2) | ||
| + | Image:Tempête D'Esprit.jpg|<Center>[[Tempête D'Esprit]] [[Image:Icone3.jpg|Le Roi En Jaune]] (x4)<br>Le premier est COMBAT, le second FIGHT. | ||
| + | Image:Poing De Yog-Sothoth.jpg|<Center>[[Poing De Yog-Sothoth]] [[Image:Icone4.jpg|L'Horreur De Kingsport]] (x4) | ||
| + | Image:Rasoir Spectral.jpg|<Center>[[Rasoir Spectral]] [[Image:Icone4.jpg|L'Horreur De Kingsport]] (x3) | ||
</gallery> | </gallery> | ||
| − | </center> | + | <br></center> |
| + | |||
| + | == [[Cartes Spéciales]] == | ||
| + | <center><gallery widths="170px" heights="245px" perrow="5"> | ||
| + | Image:Revolver_d%27ajoint.jpg|<Center>[[Revolver De L'Adjoint]] | ||
| + | Image:EM_Bête_Intérieure.jpg|<Center>[[Bête Intérieure]] (x2) [[Image:Icone3.jpg|Le Roi En Jaune]] | ||
| + | Image:EM_Flamme_D%27Azure.jpg|<Center>[[Flamme D'Azure]] (x2) [[Image:Icone3.jpg|Le Roi En Jaune]] | ||
| + | </gallery> | ||
| + | <br></center> | ||
| + | |||
| + | ==RESTE== | ||
| + | Cartes blessures/folies ? | ||
| + | Autres ? | ||
Version du 18 mars 2010 à 03:22
Dans la version anglophone, la compétence Combat de l'investigateur est Fight. Comme pour Discrétion/Evasion, Volonté/Horreur ou Savoir/Sort, il existe un couple Fight/Combat (en anglais) ou combat est un test dérivé du test Fight.
Lors de la traduction française, Fight et Combat ont été traduit tous deux par Combat !
Pour rétablir l'importante différence entre les deux, voici la liste exhaustive de toutes les cartes qui porte la mention Combat (et PAS Fight) en anglais. Il est très aisé de souligner sur ces cartes le mot Combat. Ainsi, nous aurions dans la version française le couple Combat/Combat comme traduction de Fight/Combat.
Sommaire
Cartes Lieu
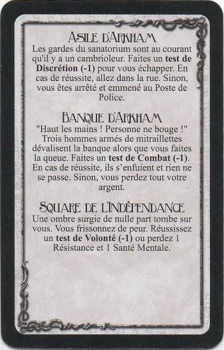
Banque. 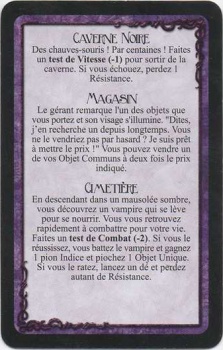
Cimetière. 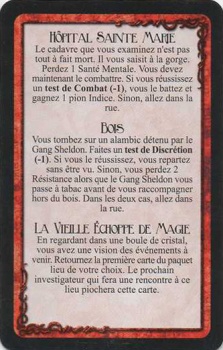
Hopital Sainte-Marie 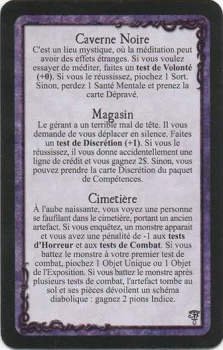
Cimetière. La Malédiction Du Pharaon Noir 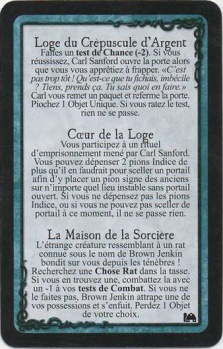
Maison de la Sorcière. L'Horreur De Dunwich 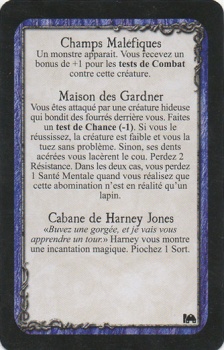
Champs Maléfiques. L'Horreur De Dunwich 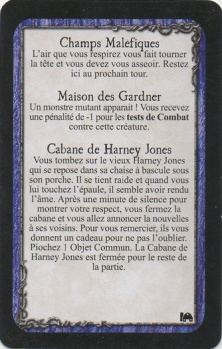
Maison des Gardner. L'Horreur De Dunwich 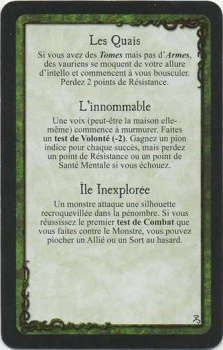
Ile inexplorée Le Roi En Jaune 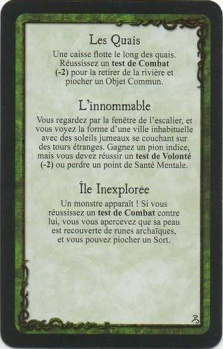
Ile inexplorée Le Roi En Jaune 
Société des Historiens Le Roi En Jaune


Cartes Portails
Seule une Rencontre Portail d'Innsmouth (Contrée du Rêve en bleu) nécessite un test de Combat.
Compétences

Tireur d'Elite (x2)


Alliés


Objets Communs
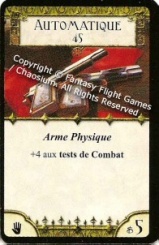
Automatique 45 (x2) 
Couteau (x2) 
Croix (x2) 
Derringer (x2) 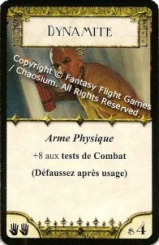
Dynamite (x2) 
Fouet (x2) 
Fusil (x2) 
Fusil à Pompe (x2) 
Hache (x2) 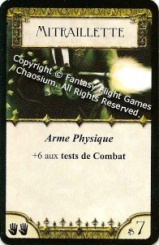
Mitraillette (x2) 
Révolver .38 (x2) 
Sabre de Cavalerie (x2) 
Athame Le Roi En Jaune (x2)


Objets Uniques

Couteau Enchanté (x2) 
Eau Bénite (x4) 
Gardien Bleu de la Pyramide
Le premier est COMBAT, le second est FIGHT
Lame Enchantée (x2) 
Poudre d'Ibn-Ghazi (x2)


Objets De L'Exposition

Sorts

Atrophie (x6) 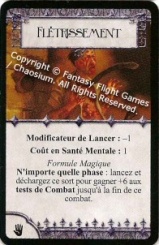
Flétrissement (x5) 
Lier un Monstre (x2) 
Tempête D'Esprit Le Roi En Jaune (x4)
Le premier est COMBAT, le second FIGHT.


Cartes Spéciales


RESTE
Cartes blessures/folies ? Autres ?


